Last Update Date:2024/10/15
Supported App Versions:6.18 and above
*The image on the page may differ from the actual app screen.
Log Display Screen
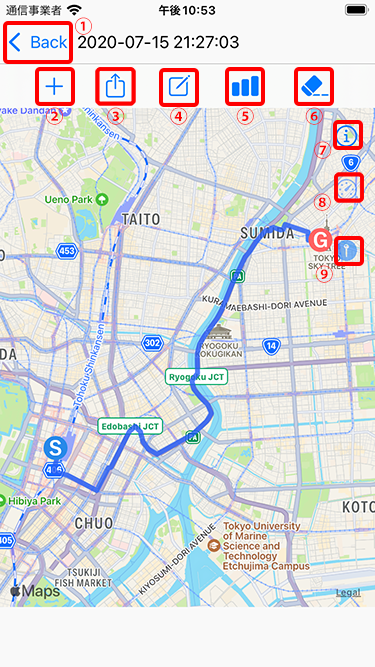
- The log list screen will open
- Logging screen will open. (You can add to and trace the log you are viewing.)
- Logs can be shared via SNS and File output
- Detailed log information will open
- Open the log altitude graph
- Location information deletion function opens.
- Map type change
- Change the line type (the color can be changed according to the speed)
- Waypoint Display
By tapping the “+” button, you can add to the current log or create a new log while viewing the current log.
When you tap the action button (3), a dialog box for selecting an action will appear. Select an action.
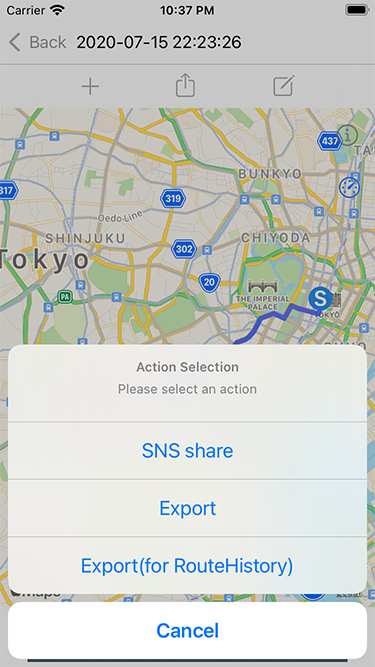
You can share text and images to Twitter and other sites using the “Share SNS” function.
You can use “Export” or “Export (for RouteHistory)” to export files.
The Export (for RouteHistory) outputs the title, notes and group information of the log.
Therefore, if you want to load a file into another terminal’s RouteHistory or use it for backup purposes, please use the “Export (for RouteHistory)”.
You can use Export if you want to use it with Google Earth or other apps.
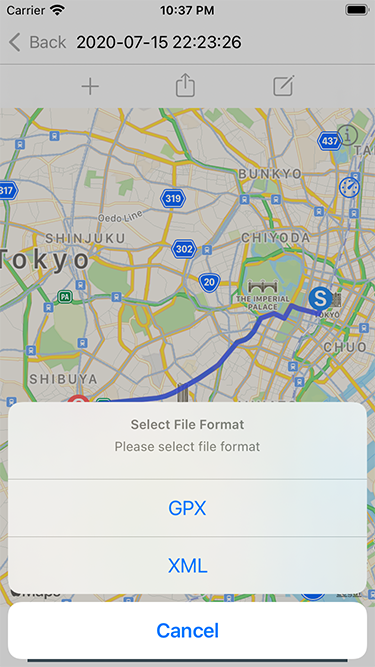
After selecting “Export” or “Export (for root history)”, the file format selection dialog will appear as shown in the image below, and the file will be output in the selected format.
The contents of the file are the same for both GPX and XML.
Tap the (7) button to change the line type to a color based on the speed.
The line will be displayed in red to green based on the maximum speed of the log being displayed.
Tap the button (8) to display the waypoints set in the log.
You can also add a waypoint at any location by long tapping on the map while a waypoint is displayed.
For details on editing waypoints, please refer to “Logging Screen -> Waypoints”.
Log Details
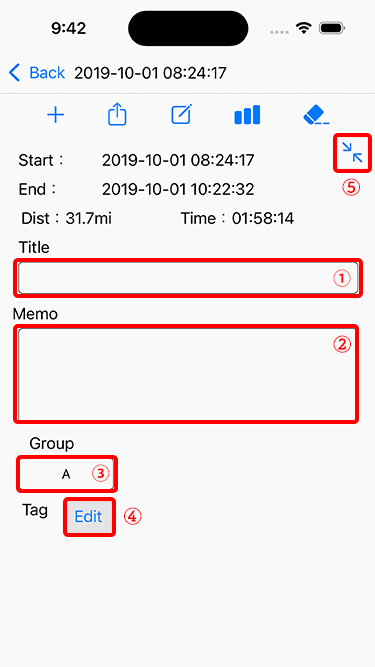
- Log title entry field
- Memo entry field
- Group entry field
- The tag edit screen will open (see Edit Tags for more information)
- Resize log detail screen
If you enter a name in the title field, the title of the log changes to the value you entered.
By leaving the title field blank, it becomes the original “log of the start time of recording”.
Groups can manage logs alphabetically from A to Z.
The default group is “A”.
You can name the tags as you wish.
Multiple tags can be set for a single log.
Tag Edit
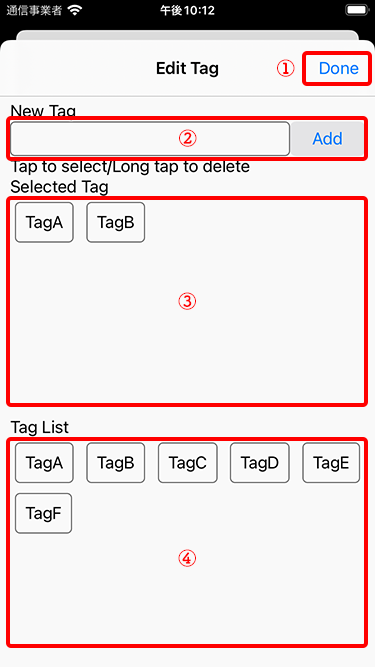
- Close the tag edit screen
- Add new tag
- List of tags currently set
- List of tags registered in the system
New tags can be registered by entering them in the (2) text box and tapping the Add button.
You can delete a tag set in (3) by long tapping it.
You can set a tag in the log by tapping the tag from the list in (4).
You can delete a tag registered in the system by tapping the tag in (4).
* If the tag to be deleted has been set in the log, the tag will also be deleted from the log (the log itself will not be deleted).
Altitude graph
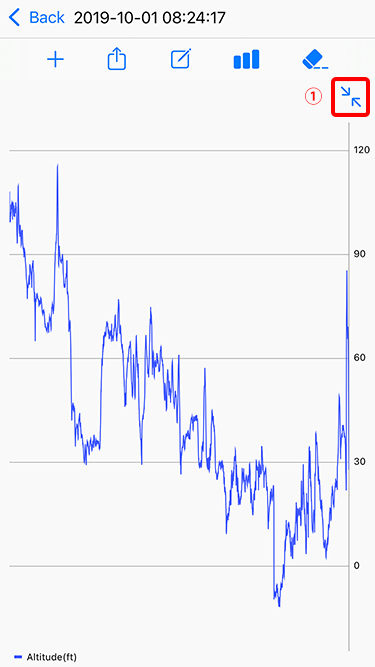
- Resize altitude graph screen
Tap the button (5) to display the altitude of the recorded log in a graph.
Since the data acquired by GPS is displayed, the error may be large depending on the usage conditions.
GPX File Output
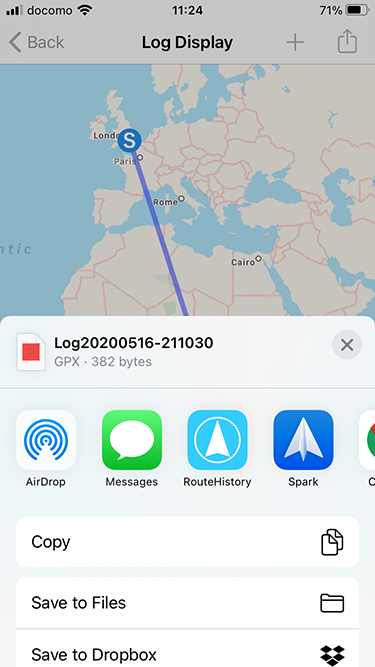
Tap the action button and select “Export” or “Export (for RouteHistory)” to display the above screen.
Selecting the output destination from the list outputs the GPX file in the specified manner.
The output file is named “Log Logging start date and time.gpx”.
Location information deletion
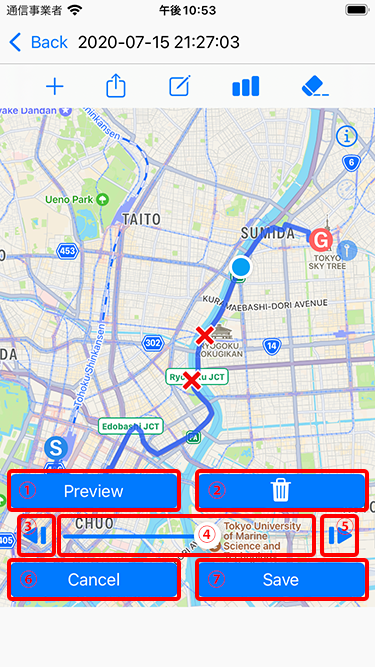
- Displays a preview after position deletion
- Marks the currently selected position as the deletion position
- Move back one selection position
- Selection position slider
- Advance one selection position
- Closes the delete location function
- Delete and save the selected location information
Location information can be selected and deleted.
This function can be used to delete unnecessary information in cases where GPS accuracy is poor and only one point is significantly out of alignment.
With the position to be deleted selected by operating the slider (④) and buttons (③) and (⑤), tap the button (②) to mark it as the position to be deleted.
An “X” mark will appear at the marked position.
* If you want to delete a certain section, you need to mark the position of the entire section.
Check the state of the file after deletion using the preview button in (1), and save the file using the button in (7).
Please note that the data cannot be restored after saving.
If you have not purchased a subscription to the Premium feature or Route History+, you may save once by viewing one reward ad.
*This function is not available for logs recorded with versions of the application prior to 4.5.
*Please use data that has been exported to a GPX file and re-imported into the root history.